
⚡ Quick Answer
Press [Y=] and enter your function. Press [GRAPH]. Then press [2nd] + [TRACE] to open the CALC menu, choose option 2: zero. Set a Left Bound, then a Right Bound on either side of the zero, then press [ENTER] for the Guess. The calculator shows the exact zero at the bottom of the screen. Keep reading for the full step-by-step breakdown, a real example, and how to handle multiple zeros.
What Is a Zero (and Why Does It Matter)?
Before we touch any buttons, let me make sure we are talking about the same thing. Because students sometimes confuse zeros, roots, and x-intercepts — and they all mean the exact same thing.
A zero of a function is the x-value that makes the function equal to zero. So if you have a function like f(x) = x² − 4, you are looking for the value of x that makes f(x) = 0. In this case, the answers are x = 2 and x = −2. Those are the zeros.
On a graph, zeros show up exactly where the curve crosses the x-axis. That is why they are also called x-intercepts — because they are the points where the line intercepts (crosses) the horizontal x-axis.
Three names, one idea: Zero, root, and x-intercept all refer to the same point. On the TI-84, you use the option called "zero" in the CALC menu to find all of them.
Why does this matter? Finding zeros comes up constantly in math — solving equations, factoring polynomials, analyzing graphs in physics, optimizing functions in calculus. Your TI-84 can find them in seconds, even for complicated functions that would take many steps by hand.
I have been teaching this in classrooms for over fifteen years. Once students learn this one feature on the TI-84, it changes how fast they can work through problems.
Step-by-Step: How to Find Zeros on TI-84
Here is the complete process. Follow each step exactly, and you will find a zero on any function. I will explain what each step does along the way — not just what to press.
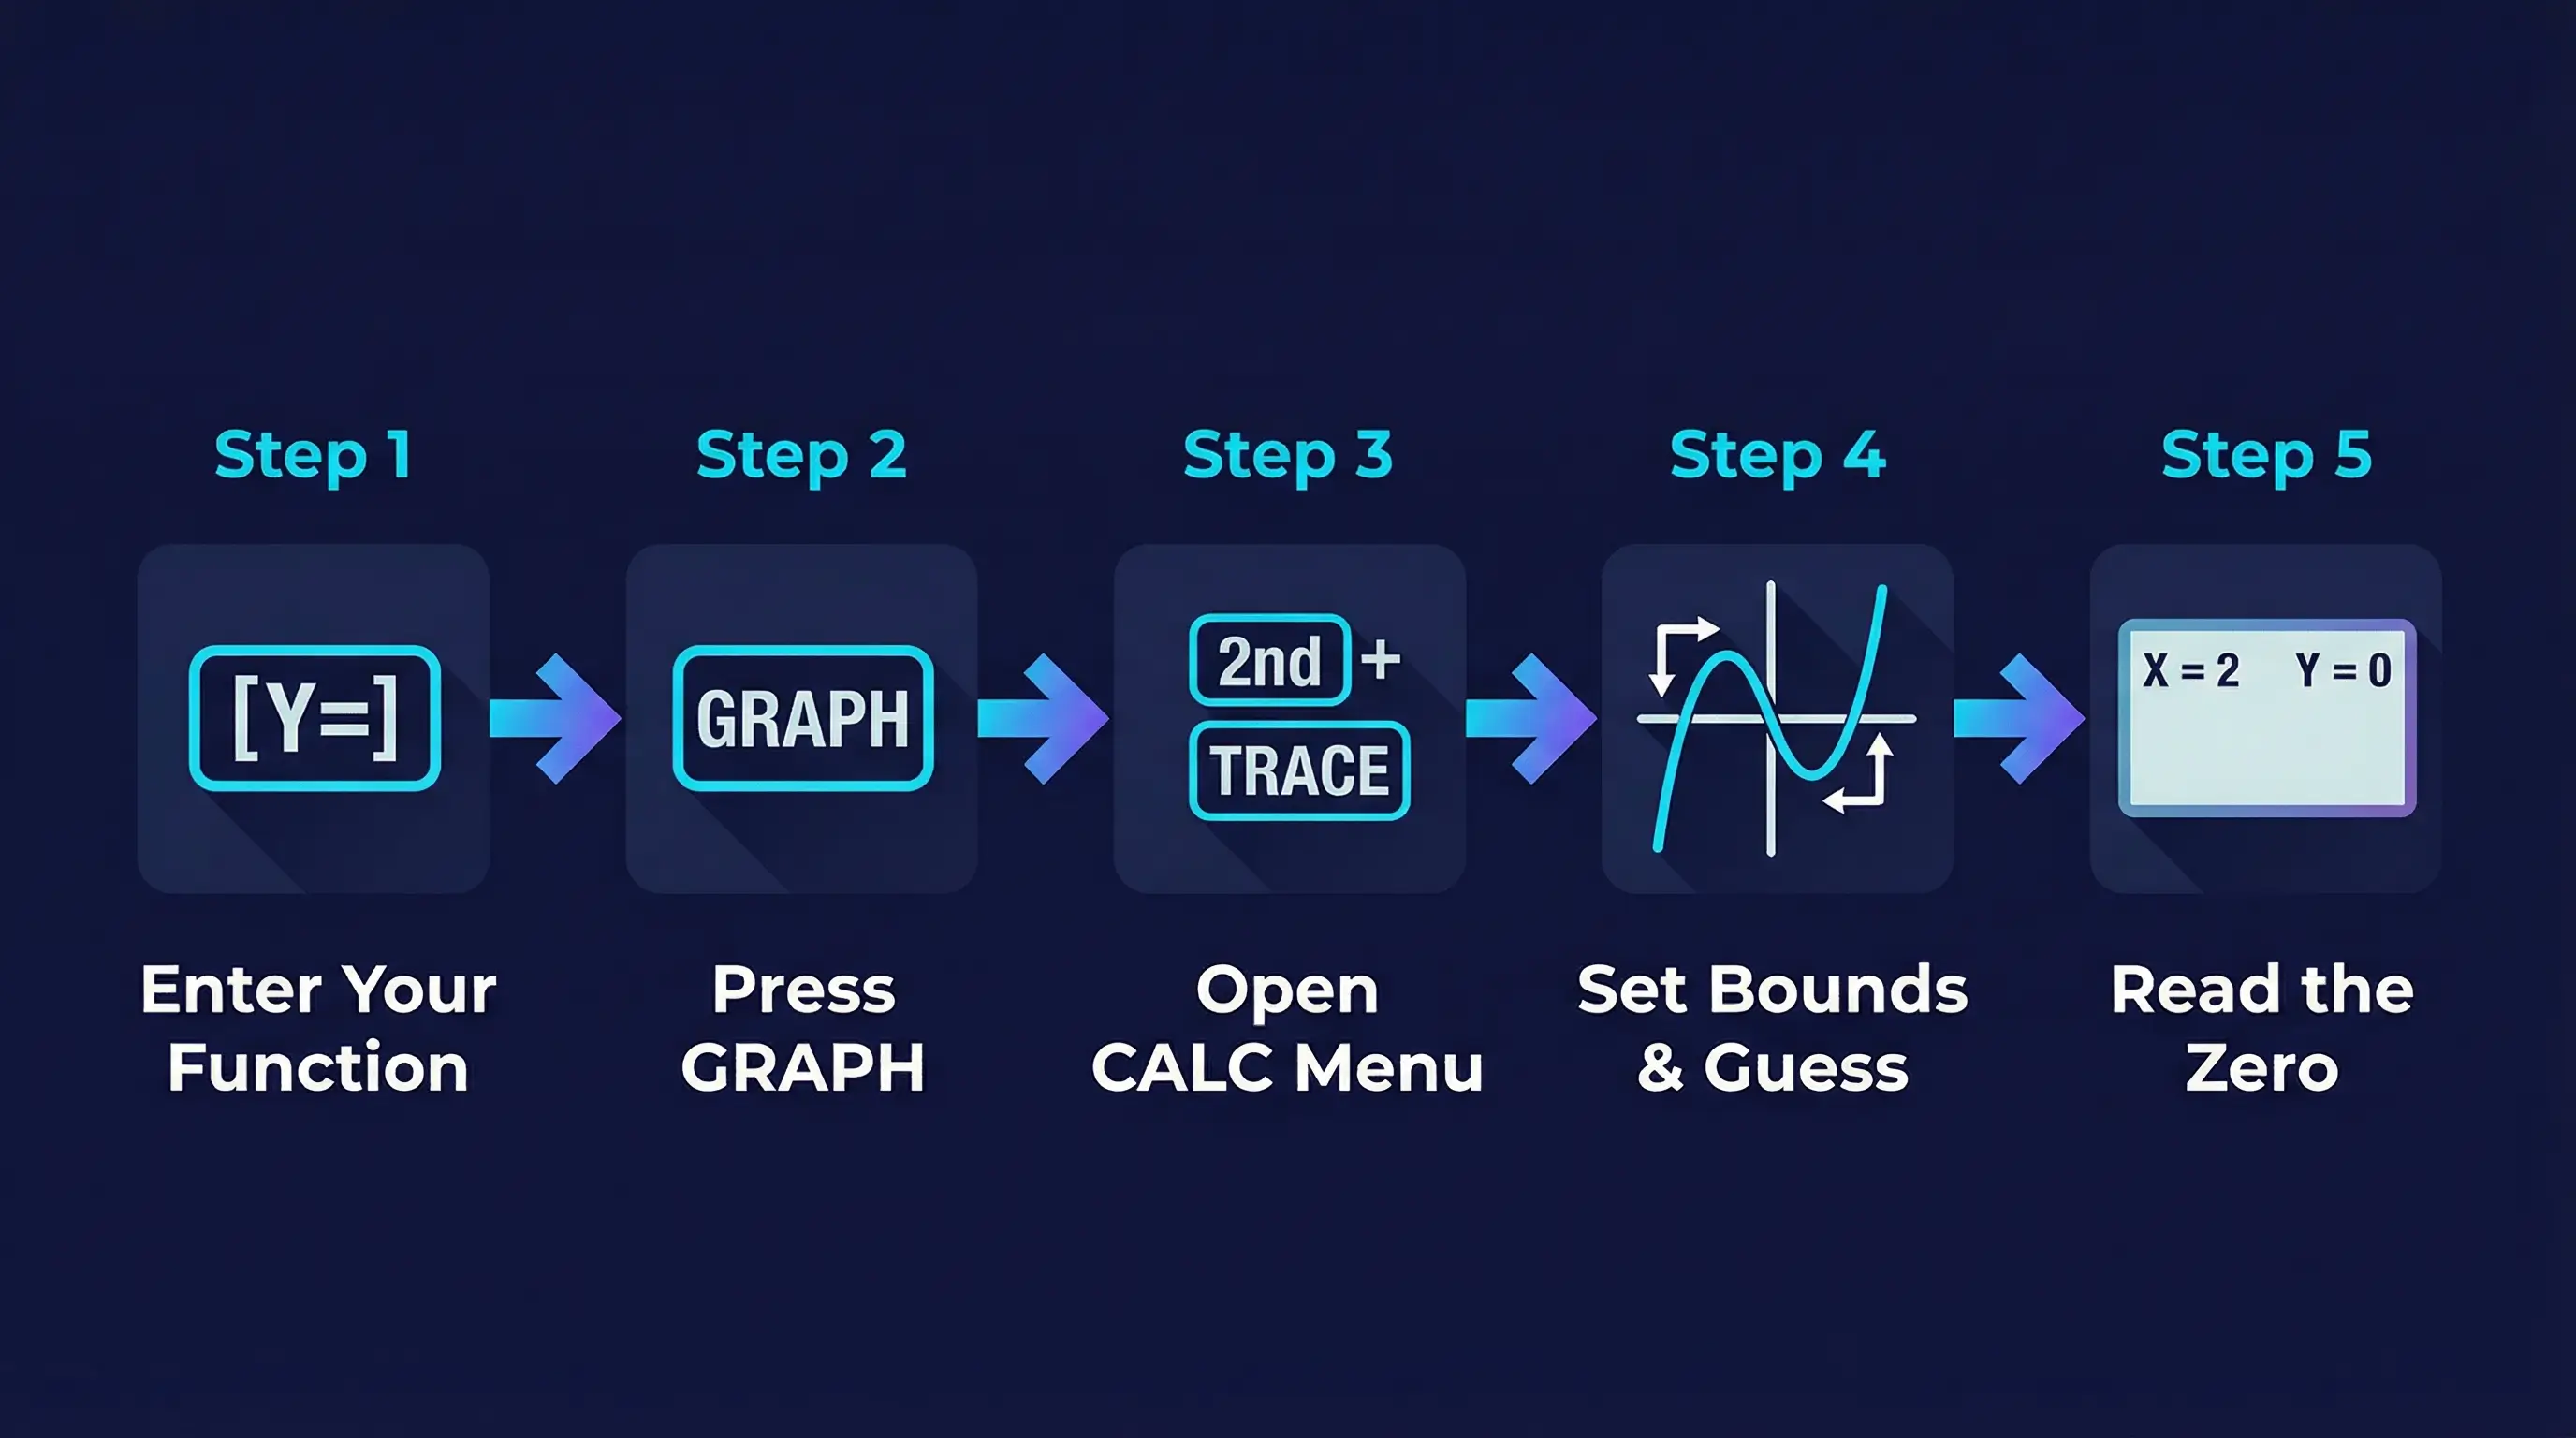
Press [Y=] and Enter Your Function
Press the Y= button in the top-left corner of your TI-84. This opens the function editor. Next to Y₁ =, type your function using X as the variable. For example, to enter x² − 4, press X,T,θ,n then x² then − then 4. Press ENTER when done.
Press [GRAPH] to See the Curve
Press the GRAPH button (top-right corner). The calculator draws your function on the coordinate plane. You should be able to see where the curve crosses the x-axis — those crossing points are the zeros you are after. If the graph looks blank or strange, press ZOOM then select 6: ZStandard to reset the window to the default view (−10 to 10 on both axes).
Press [2nd] + [TRACE] to Open the CALC Menu
Press 2nd first (blue button, bottom-left area), then press TRACE (top row). This opens the CALCULATE menu — a list of tools the TI-84 has for analyzing graphs. You will see options like value, zero, minimum, maximum, intersect, and more.
Select Option 2: zero
Press 2 on your keypad to select 2: zero. You are back on the graph screen, and there is a cursor blinking on the curve. The calculator is now waiting for you to tell it where to look for the zero. It needs three pieces of information from you: a left bound, a right bound, and a guess.
Set the Left Bound — Press [ENTER]
The bottom of the screen says "Left Bound?". Use the ◄ left arrow key to move the cursor to a point that is to the left of the zero you want to find. It does not need to be exact — just somewhere on the left side of the x-intercept. Once you are there, press ENTER. A small arrow marker appears at the top of the screen marking your left boundary.
Set the Right Bound — Press [ENTER]
Now the screen says "Right Bound?". Move the cursor to the right using the ► arrow key until it is on the right side of that same zero. The cursor must pass over the x-intercept. Once you have passed it and are on the right side, press ENTER. A second arrow marker appears, and the zero must be somewhere between these two markers.
Set the Guess — Press [ENTER]
The screen now says "Guess?". The cursor is between your left and right bounds. Move it as close to the crossing point as you can, then press ENTER. The TI-84 uses this as a starting point for its numerical search. For most problems, you do not need to be precise — anywhere between the bounds works.
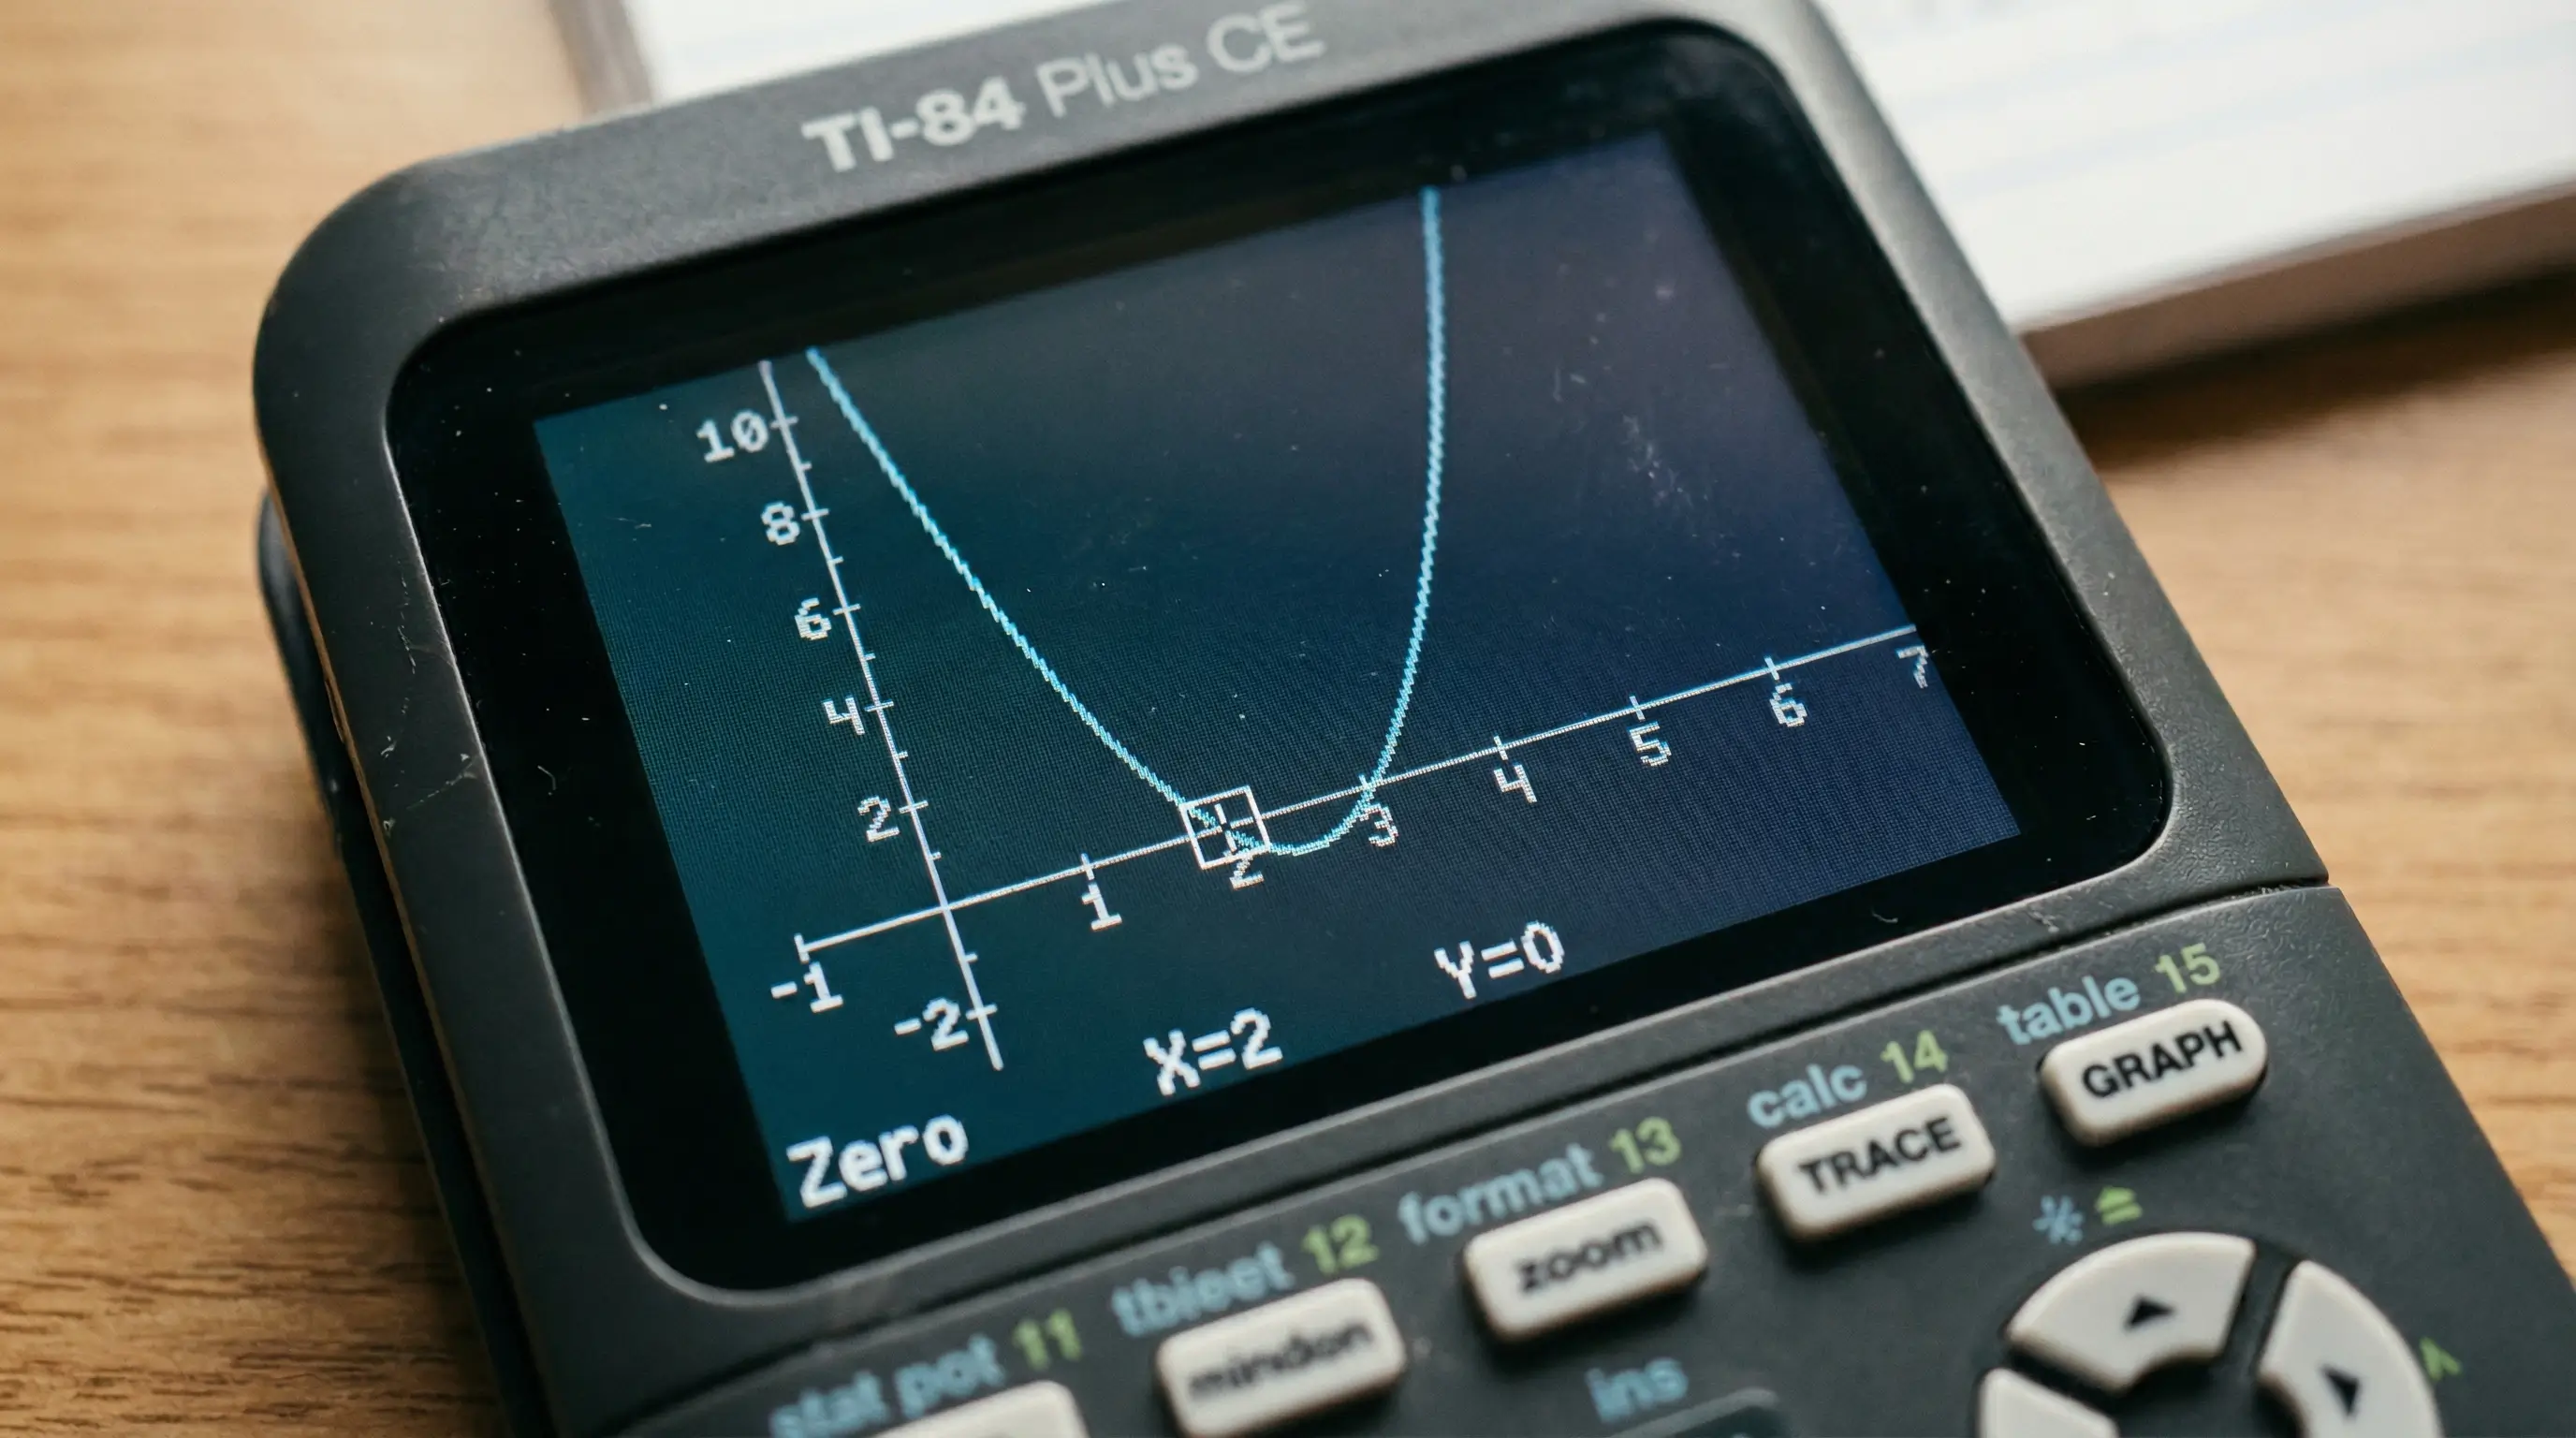
Read the Zero at the Bottom of the Screen
The calculator displays X = [value] and Y = 0 at the bottom of the screen. The X value is your zero. The Y value should be 0 (or extremely close to 0, like 1E−13, which means 0.0000000000001 — essentially zero due to rounding). Write down the X value. That is your answer.
Summary of button presses: Y= → enter function → GRAPH → 2nd + TRACE → 2 → set Left Bound (ENTER) → set Right Bound (ENTER) → Guess (ENTER) → read X value.
Worked Example: Finding Zeros of x² − 5x + 6
Let me walk you through a real example from start to finish. We will find the zeros of the function f(x) = x² − 5x + 6. If you want to verify by hand: this factors as (x − 2)(x − 3), so the zeros are x = 2 and x = 3. Let us confirm that with the TI-84.
Entering the Function
Press Y=. Move to Y₁ and clear any existing function (press CLEAR if needed). Now type the function:
Press GRAPH. You should see an upward-opening parabola that crosses the x-axis in two places — near x = 2 and x = 3. If the graph looks too zoomed in or out, press ZOOM → 6: ZStandard to fix it.
Finding the First Zero (x = 2)
Press 2nd + TRACE, then press 2 to select zero.
- Left Bound: Move cursor left until you are at about x = 1 (left of the first crossing). Press ENTER.
- Right Bound: Move cursor right to about x = 2.5 (past the first crossing, but before the second one). Press ENTER.
- Guess: Move cursor to about x = 2. Press ENTER.
Result: X = 2, Y = 0. The first zero is confirmed at x = 2. ✓
Finding the Second Zero (x = 3)
Press 2nd + TRACE, press 2 again.
- Left Bound: Move cursor to about x = 2.5 — between the two zeros. Press ENTER.
- Right Bound: Move cursor to about x = 4 — past the second zero. Press ENTER.
- Guess: Move to about x = 3. Press ENTER.
Result: X = 3, Y = 0. The second zero is at x = 3. ✓
Both zeros found: x = 2 and x = 3. These match exactly what we get by factoring. The TI-84 did in 30 seconds what takes students minutes by hand.
How to Find Multiple Zeros on TI-84
Many functions have more than one zero. A quadratic (degree 2) has up to two zeros. A cubic (degree 3) has up to three. Each zero must be found one at a time — the TI-84's zero feature finds one zero per run. Here is how to find all of them efficiently.
The Rule: One Zero Between Each Pair of Bounds
The key to finding multiple zeros is making sure only one zero sits between your left bound and right bound. If you put two zeros inside the same bounds, the calculator may find either one — or give you an error.
Here is my advice: before you start pressing buttons, look at your graph and count the crossings. If the graph crosses the x-axis three times, you will need to run the zero feature three separate times — each time with bounds that isolate just one crossing.
Example: f(x) = x³ − 6x² + 11x − 6
This cubic function has three zeros at x = 1, x = 2, and x = 3. To find all three:
| Zero # | Left Bound (approx.) | Right Bound (approx.) | Result |
|---|---|---|---|
| First zero | x = 0 | x = 1.5 | X = 1 |
| Second zero | x = 1.5 | x = 2.5 | X = 2 |
| Third zero | x = 2.5 | x = 4 | X = 3 |
Use the TABLE feature to help identify where zeros are. Press 2nd + GRAPH to open the table. Look for rows where the Y value changes from positive to negative (or vice versa). The zero is between those two X values.
Troubleshooting: Common Errors When Finding Zeros
Even experienced students run into problems with the zero feature. Here are the most common issues and how to fix them.
Error 1: ERR:NO SIGN CHNG
This is the most common error. It means your left and right bounds are on the same side of the x-axis — so the calculator cannot detect where the function crosses zero.
Fix: Look at your graph again. Make sure your left bound is clearly to the LEFT of the x-intercept and your right bound is clearly to the RIGHT. The function must actually cross the x-axis between your bounds — not just touch it, and not just get close to it.
Error 2: Graph Looks Blank or Way Off Screen
This usually means your window settings do not match the range of the function. If you are graphing something like y = x² − 1000, the zeros at x = ±31.6 are outside the default window of −10 to 10.
Fix: Press ZOOM → select 0: ZoomFit. The calculator auto-scales the window to show your graph. Or press WINDOW and manually set Xmin, Xmax, Ymin, and Ymax to values that cover your expected zeros.
Error 3: The Zero Feature Finds the Wrong Zero
If your bounds accidentally contain two zeros, the calculator picks one — often the closer one to your Guess. Set tighter bounds to isolate the zero you want.
Error 4: Y Value Is Not Exactly 0 — Something Like 1E−12
This is not really an error. The TI-84 uses numerical methods that sometimes give you 0.000000000001 instead of a clean 0. That is still a zero — just rounding noise from the calculator's internal arithmetic. Accept the X value and move on.
Error 5: Even Multiplicity Roots (Graph Touches but Does Not Cross)
If your function has a root like (x − 3)², the graph touches x = 3 but curves back up without crossing through the x-axis. The TI-84's zero feature looks for a sign change — a crossing. It may struggle to find these tangent zeros.
Fix: Zoom in very close to the suspected zero, narrow your bounds as tightly as possible around x = 3, and use a guess right at the touching point. This forces the calculator to search in a region so small it has to detect the tangent.
| Problem | Likely Cause | Quick Fix |
|---|---|---|
| ERR:NO SIGN CHNG | Bounds on same side as zero, or no real zero in range | Re-set bounds so they straddle the x-intercept |
| Blank graph screen | Window too small or too large for function | Press ZOOM → 0: ZoomFit |
| Wrong zero found | Both zeros inside same bounds | Narrow bounds to isolate one zero |
| Y ≈ 1E−13 instead of 0 | Numerical rounding (normal) | Treat as zero — X value is correct |
| Touch-but-no-cross root | Even multiplicity (e.g. (x−3)²) | Zoom in very tight around touching point |
🖩 Practice Finding Zeros Right Now
No physical TI-84? Use our free browser-based TI-84 Plus CE emulator. Graph any function and practice the zero feature — it works exactly like the real thing. No downloads. No sign-ups. Completely free.
Launch Free TI-84 Calculator →Pro Tips for Finding Zeros Faster
These are the tips I give to students preparing for AP Calculus exams or standardized tests like the SAT. They save real time under pressure.
-
1
Use ZDecimal for Cleaner Zero Values
Press ZOOM → 4: ZDecimal. This sets the window so every pixel on the screen represents exactly 0.1 units. The cursor moves in 0.1 increments. This makes it much easier to land exactly on a zero when setting your bounds and Guess — which leads to cleaner, more exact answers.
-
2
Check the Table First to Spot Zeros
Before graphing, press 2nd + GRAPH to view the TABLE. Scroll through and look for any row where Y changes sign — there is a zero hiding between those two X values. This helps you set tight, accurate bounds without guessing.
-
3
Narrow Your Bounds as Tight as Possible
The tighter your left and right bounds are around the zero, the more precise your answer will be. If you set bounds of x = −5 to x = 5 for a zero at x = 0.001, you might not get an accurate result. Zoom in first (use ZOOM → 2: Zoom In), then set your bounds much closer to the crossing.
-
4
Always Verify: Plug the Zero Back Into the Function
After finding a zero, verify it. Go to the home screen (press 2nd + MODE to quit). Store your X value (it is already there from the zero feature — just press STO→ then X,T,θ,n). Then type Y₁ and press ENTER. If f(x) = 0, you confirmed the zero. If not, something went wrong.
-
5
Use INTERSECT Instead of ZERO for Equation Solutions
If you are solving an equation like x² = 3x + 2, instead of rearranging to x² − 3x − 2 = 0 and finding zeros, try this: enter Y₁ = x² and Y₂ = 3x + 2, then press 2nd + TRACE → 5: intersect. The x-coordinate of the intersection is the solution. Same concept — different approach. For some problems this is faster.
What If There Are No Zeros to Find?
Some functions do not cross the x-axis at all. Take y = x² + 4. That parabola sits entirely above the x-axis — it never touches zero. If you try the zero feature on it, you will get the ERR:NO SIGN CHNG error no matter what bounds you set. This is not a mistake — it means there are no real zeros.
These functions have complex zeros — numbers involving the imaginary unit i (like x = 2i). The TI-84 cannot find complex zeros using the graphing method. Complex zeros only exist in the world of complex numbers — they do not show up on a standard x-y graph.
If a quadratic ax² + bx + c has a negative discriminant (b² − 4ac < 0), it has no real zeros. The TI-84 will confirm this visually — the graph never touches the x-axis. This is expected behavior, not an error.
A quick way to tell: graph the function. If the graph never crosses or touches the x-axis, there are no real zeros. The calculator is working correctly — the zeros simply do not exist in the real number system.
Frequently Asked Questions
Press [Y=] and enter your function. Press [GRAPH]. Then press [2nd] + [TRACE] to open the CALC menu. Select 2: zero. Use the arrow keys to set a Left Bound to the left of the zero, press ENTER. Set a Right Bound to the right of the zero, press ENTER. Move to a Guess near the zero and press ENTER. The calculator displays the zero as X = [value] and Y = 0 at the bottom of the screen.
They are the same thing — just different names used in different contexts. A zero is the x-value that makes f(x) = 0. An x-intercept is the point on the graph where it crosses the x-axis (where y = 0). A root means the same thing too. On the TI-84, all three are found using the "zero" option in the CALC menu.
This error means the TI-84 could not find a sign change (from positive to negative, or negative to positive) between your left and right bounds. This happens when: (1) your bounds are both on the same side of the zero — fix by setting bounds that straddle the x-intercept, (2) the function has no real zeros in that region, or (3) the zero has even multiplicity and only touches — not crosses — the x-axis. In case 3, zoom in very tightly and retry.
The TI-84 finds one zero per run. For each additional zero, repeat the process: press [2nd] + [TRACE] → 2: zero, then set new bounds that isolate the next x-intercept. Make sure only one crossing falls between your left and right bounds each time. A cubic function with three real zeros will require you to run the zero feature three separate times.
No. The graphing zero feature on the TI-84 only finds real zeros — the places where the graph visually crosses the x-axis. If a function has only complex (imaginary) roots, like y = x² + 4, the graph never touches the x-axis and the zero feature will return an error. Complex zeros cannot be found this way. You would need to use the quadratic formula or factor by hand to find them.
The Left Bound and Right Bound are the two limits of the search interval you are giving the TI-84. You are telling the calculator: "I know the zero is somewhere between this X value and that X value — find it for me." The left bound must be to the left of the zero, and the right bound must be to the right. The function must change signs between the two bounds for the search to work.